Finishing your enclosure is optional. You will still have a great
sounding pedal whether you do or do not. If you want a nice
professional looking “boutique” pedal you might want to
consider giving it a coat or 2 of paint and maybe some decals. If
you decide not to, skip the section on finishing your pedal. You
can always go back and finish your pedal afterwards if you
change your mind. You’ll just have to take everything apart. If
you want to finish your pedal I strongly suggest that you do this
step first before you move on to populating the circuit board.
This way you can give the paint time to cure to the metal while
you work on the circuit board. In my opinion, finishing your
enclosure is the most difficult part. Making a professional
looking pedal is not an easy task. If you are very concerned
with the way the paint job of your pedal turns out, I suggest you
practice on some scrap material first.
Preparing the Surface
Any metal surface that you want to paint must be scored to
give the paint something to stick to, or in other words scuffed up
with some fine emery cloth (the black sand paper). Nothing too
difficult here. Just grab some emery cloth and start rubbing. It
doesn’t take much. Just enough so that the entire surface is
good and scratched up. Don’t push too hard or you will make
deep scratches that will show up through the paint.
TIP: A cool looking finish that is very easy to do is the
brushed aluminum look. Since you have to sand the enclosure
anyways, you may as well try it out and see if you like it. Cover
just your fingertip with the emery cloth. Make series of small
concentric circular strokes along the length of the enclosure
surface and then back the other way only slightly overlapping
the first path of circular strokes. If you like the looks of this,
move on to the “decals” section. If not, continue on.
After you’ve finished sanding the enclosure you must wash it
with soapy water to get off all the aluminum dust that is stuck to
the oils that are left by your hands. If you don’t do this the paint
will peel off. Your painting surface is prepped and ready to go.
From here on out, try not to touch it with your bare hands till the
final coat of paint has dried and cured.
Color Coat
This is entirely up to you. Solid color, 2 tone fade, swirls. It
just depends on your painting skills. I find that it is best to use a
very light “dusting” for each coat and apply several coats every
30 seconds until the substrate no longer is visible. I do this
because even if you use the same brand of paint, the runniness
changes from color to color. You don’t want to apply too many
coats if you are going to apply a final clear coat because the
solvents in the clear coat will eat the underlying paint if it is too
thick. The type of paint to use is also up to you, but I
recommend something that is intended for outdoor use as it
tends to be a little more durable. I prefer enamel based spray
paints. An auto parts store is going to have a good selections
of paints that would work well for a pedal. Keep in mind that
different brands of spray paint have different instructions
depending upon what type of solvents are used so read the
directions. When your color coat has dried enough so that you
can touch it, you can bake the enclosure in the oven to speed
up the drying process. 150F-200F for 2-3 hours.
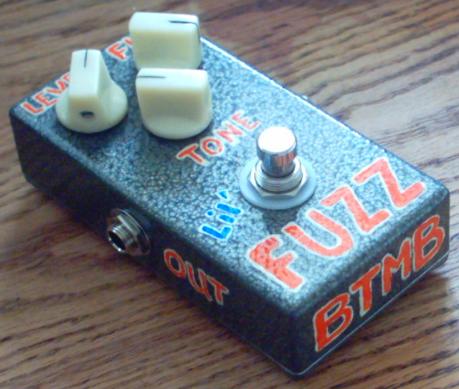
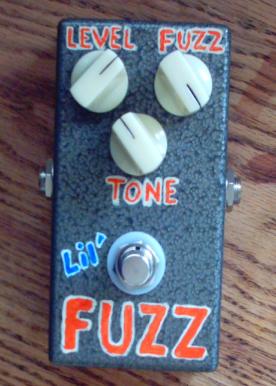
Someone emailed me and asked me to mention Hammerite
or sometimes called Hammertone paint. This stuff is hands
down the best paint for the average DIYer. It is the most
durable, chip resistant, scratch resistant, paint that you can get
in a spray can. And it looks pretty cool too!. It usually comes in
earthy or metal tones. It's a textural effect paint. It's designed
to look like metal that was beaten with a ball hammer. Here's
some pics of a pedal that I made with a Hammertone color coat,
handpainted graphics (acrylic paint), and a clear coat on top.